|
|
|
|||||

Portrait photography has been my jam since I decided to major in photography ten-plus years ago, and I am lucky enough to share what I’ve learned through the years here at Aperture Academy! On a sunny Saturday morning, I took seven students through the world portrait photography using natural light. The group consisted of individuals with different experience levels, but they all shared a common interest and positive energy in learning.
We started off with a review of the basics, especially spending time on the exposure triangle: aperture, shutter speed, and ISO. The foundation off all excellent photography starts here—understanding how the camera works and takes in light will allow photographers to make conscious decisions in any shooting condition. While all three play an equal role in exposure, we focused in depth on aperture (no pun intended…haha), as we would be using aperture priority mode during our hands on session. We also discussed lens choice, tips to evaluating an image, and composition before we headed out to photograph our model for the day: Jasmine!
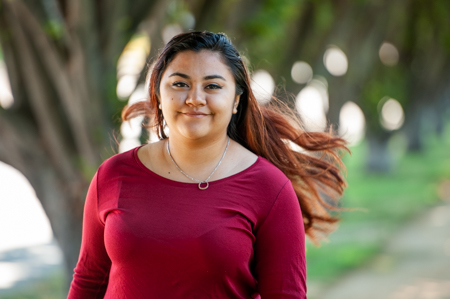 Once outside, the students and I jumped into the four main aspects right away: finding perfect exposure in great light, posing subjects in attractive ways, working with our subject to get great expressions, and finding great backgrounds. First was to see and work with natural light. While the sun is a powerful light source, it is also very harsh mid-day. So how do we soften it? It is all about positioning. We tried putting Jasmine in front of the sun, and right away, she had to look down because it was so bright. The students took some test shots and noticed the squinting. Additionally, one student brought up the heavy shadows under Jasmine’s eyes. Not super flattering! We turned Jasmine so that the sun was on the side of her, and the discomfort went away. However, a new problem arose: half her face was in shadow while the other was lit by the direct sunlight. The high contrast was also not the most flattering. Finally, we placed the sun behind her. While this might make her face seem “dark” at first, in reality, if exposed correctly, what we get is a very even tone on her face (photographing the in shade will have similar effects).
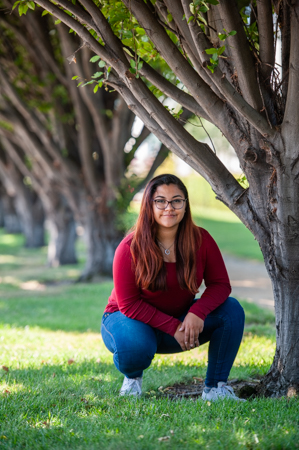
 From then on, we would only take photos of Jasmine in soft light. Next came working with background. We offer workshops in amazing locations. Big Sur, New Zealand, the Southwest—all are amazing landscapes to photograph. But when it comes to portrait photography, Aperture Academy headquarters is the perfect place to practice, because a good portrait can be taken anywhere when you have the right equipment and eye. I demonstrated how to use the telephoto lens to condense an image, bringing the background closer to the subject. Now, a inconspicuous bush in the background can be used as a natural blur that fills your frame. Students without a telephoto lens practiced another strategy. Instead of filling the frame with an object, they positioned Jasmine as far away from the background as possible, using the big aperture to maximize the shallow depth of field.
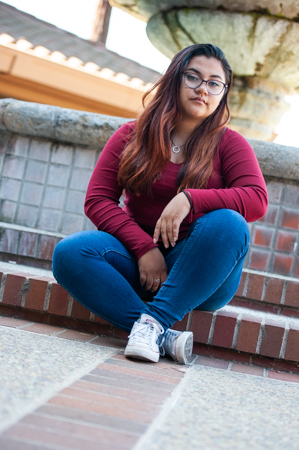
When it comes to positioning, we worked on angles. Different angles will bring a different mood on the subject. The high angle portrays an elegant and innocent feel, while photographing at a low angle can be more dramatic, making the subject more dominant. For most portraits, we can photograph straight on, but if there is a certain vibe you want to get from your subject, playing with angles can be very helpful. We also worked on positioning a subject’s head for close-up head shots. Turtling the head out may feel uncomfortable at first, but the light wrapping around the jawline really accentuates the features and gives the face definition.
We ended the day by using a reflector to add a little fill light and creating a nice catch light in Jasmine’s eye, as well as practicing how to focus on moving subjects. I had the students make two adjustments with their cameras. First, they switched their focus modes from AF-S or One Shot, to AF-C or AI Servo. This way, the camera will continuously focus on the point versus locking the focus. Next, the students set their release modes to continuous, making the camera take multiple frames rather than just one, ensuring they get that decisive moment. Jasmine walked down the walkway in a true Beyonce fashion, and we practiced following her—making sure the focus point did not leave her face.
Before I knew it, I was saying goodbye to this group. Three hours flew by like that, and I have no doubt that they will take their energy and enthusiasm for photography into future shoots!
Until next time,
Mary and the rest of the Aperture Academy Team!
If you'd like to join us at one of our workshops, you can find the schedule/sign up here.
 |
 |
 |
 |
 | |
|
 |
Other Cool Stuff→ Past Workshop Photos → 72dpi.com → How-To Articles → Photographer of the Month |
|
Contact Us→ Contact Us → About Us → Site Map |
© 2009-2024 Aperture Academy, Inc.