|
A great photograph is all about lighting, and while I can't always control the lighting on an outdoor scene, I've learned to control how that light gets recorded by my camera's sensor. The challenge, for me, is always to produce a photographic image that closely resembles how the human eye views the world.
Modern day cameras produce amazing results; however, they still can't read and record the very wide range of light that our eyes can. Human vision is a combination of the photoreceptors in the retina collecting the light reflecting off every part of the scene and then signaling by electrical impulses that image to the brain. The brain processes those impulses so that we can "see" an image. A camera works much the same way--with pixels on the sensor reading the incoming light and sending signals to the camera's computer -- but with considerably less ability to record the wide "dynamic range" of light intensities that are usually reflected from various areas of the outdoor image.
Since my camera can't capture all the shades of lighting that my eyes can, I use my Graduated ND filter to narrow and rebalance the wide range of light intensities, or "zones," so my camera can record more detail in both the shadows and highlighted areas of the scene. In the examples that follow, you'll see that it would have been impossible to capture the final photo (below) of Horseshoe Bend right in the camera without using my Galen Rowell 3-stop, hard-step Graduated ND filter.
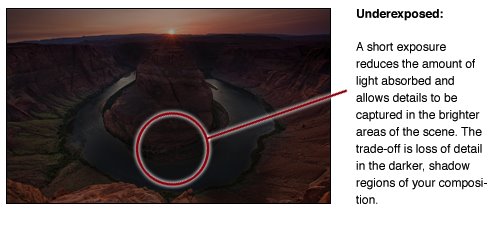
For this first exposure, I used a longer shutter speed to allow enough light to be captured down in the canyon so the details would be visible. The problem with this longer shutter speed is that the very bright sun and sky get blown out (overexposed), meaning there is no detail in those brighter areas. And when it's not recorded by the camera, there is no computer software or film processing that can ever recover the lost details.
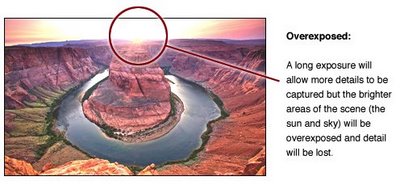
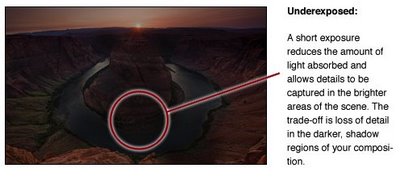
In this second exposure, I reduced the shutter speed to accurately portray the glowing sun and sky. In doing so, I now have a properly exposed sky; however, I've lost all the great detail down in the canyon. I could try increasing the exposure in the darker areas with software during postproduction, but I know from experience that adjusting those dark areas will lead to a lot of noise (grain) and result in a poor quality photo, especially when I want to create a large print.
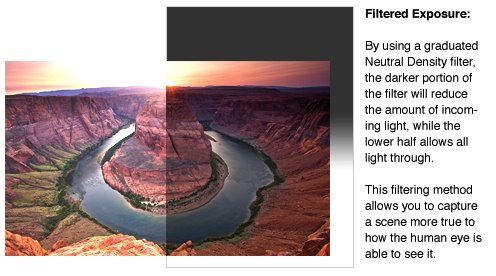
For this third exposure, I used my Galen Rowell 3-stop, hard-step Graduated ND filter. The upper half of this filter is neutral gray and 3 f-stops darker than the lower half, which is completely clear. A lighter gray gradient area along the middle blends the two halves seamlessly. It is an ideal filter for most sunrise and sunset shots, as well as for many other situations; and it was exactly what I needed to control the light conditions at Horseshoe Bend.

As you can see in this image, I superimposed the ND Grad over the right half of the scene to show the difference between shooting with and without the filter. As you can see, the dark portion at the top of the ND Grad reduces the intensity of the bright sun and sky at the same time the clear bottom of the filter allows all the light in the foreground to come through. The gradient area along the middle creates a smooth, seamless transition between the upper and lower areas. By balancing the bright sky light in the scene with the darker foreground, we're able to retain details in all areas. The final result is a photograph that is well balanced and appears much more natural.
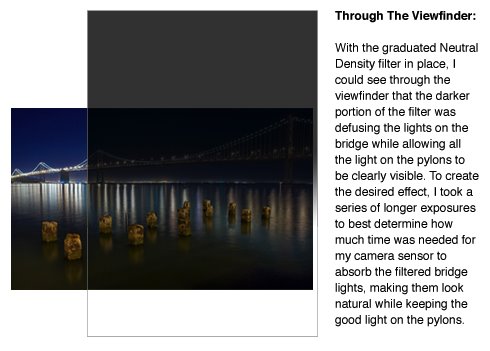
While an ND Grad is ideal for sunrise and sunset photography, it can also serve well in many other situations, such as night photography. This photo of the San Francisco Bay Bridge is an example of using the ND Grad at night. Even though it was 11 pm, and very dark, I found this waterfront scene to be very interesting. Given how dark it was, I realized it would require a long exposure. I learned that a 30-second exposure was perfect to capture the lights of the bridge; however, the pylons in the foreground were much too dark. I really wanted them to stand out, as I felt it balanced the composition and made for a more interesting shot. However, in order to get the pylons to stand out, I needed to use a much longer exposure, which would overexpose the bridge. The challenge was solved by using the Galen Rowell 3-stop, hard-step Graduated ND filter to hold back the bright lights of the bridge. I was thereby able to take this shot with a longer exposure so that the street lights behind me illuminated the pylons longer and gave them more color and definition.

The final result is exactly what I wanted -- the distant bridge lit naturally -- just as my eyes saw it -- with the pylons in the foreground brightly illuminated to create the contrast and composition I was going for. I'm often asked what the best tools and tricks are for good outdoor photography. A Singh-Ray ND Grad filter is almost always the first step.

This article was originally written by Stephen Oachs and posted on the Singh-Ray blog. See the original article and credits here.
|