The subject of white balance not only causes confusion for newer photographers, but for many who have had a camera in their hands for years as well. At the Aperture Academy, we hear it all when it comes to white balance.
"I just leave it in auto."
"I can use everything else in manual BUT that...."
"I've been meaning to ask someone about that...."
"I have no idea what it is...."
It's a crazy part of our cameras that most people ignore, or will often just figure they'll adjust it when they get into Photoshop.
The simple answer is, no. The more detailed answer is, if you shoot in RAW, you have an opportunity to adjust your white balance at home, on the computer...BUT you're missing out on a valuable tool, and let's face it, by choosing computer adjustments over in camera, you won't understand what white balance actually is.
To put it plainly, white balance is your camera trying to figure out where white is in your scene so it can properly adjust the rest of the colors and make your photograph look normal.
The problem is, white behaves differently in different lighting situations. To help remedy this problem, the camera uses the Kelvin scale. This scale runs from about 2500 to 10,000 degrees. (Different cameras have different ranges, but most land somewhere in this range.) At different times of day and in different light, white is located at a different temperature on this scale. This is why sometimes when you take a photo it looks yellow or blue, even though that's not how the scene presented itself to you.
It's important to know that every color of light has a different wavelength, and this coordinates with a different temperature, which your camera sensor is able to pick up. Warmer tones are in one range, and cooler tones are in another. Once the camera has established where white is, then it can place these other values on the chart. The lower the number is on the Kelvin scale, the cooler the tones, and vice versa.
"You mean that 2500 Kelvin would be bluish? And 7500 K would be warmer and more orangish?"
Yes. That's exactly what I mean...and, your camera white balance has settings that roughly equate to where white falls during certain conditions, so you can try to get this process right while you're in the field. These are indicated by little cryptic pictures in your camera settings. For example, there is one for sunshine, and it has a little sun picture. For typical sunny days, white falls about 5400-5500 on the Kelvin scale. If your camera is set on sunny white balance, and you're photographing a mid-day scene in sunshine, chances are your photograph will look fairly close to normal color.
The camera has several settings that fall at different spots on the Kelvin line. I've listed below what these symbols mean, and roughly where they are temperature-wise.
- AWB - stands for Automatic White Balance. This is the option roughly 75% of the photography world leaves their camera set at. What your camera does in this case is find the brightest part of a scene and assumes that it is white, then assigns that value as "white" and lets all the other colors fall in line where they will. Like I mentioned before, once the camera knows where white should be, it can balance the rest of the colors.
- Cloudy - This symbol looks about like a cloud (or blob, depending on how you think). The temperature range is about 6500-6670 K. If you think about it, this might start to make sense. Cloudy days tend to be cooler in tone, and require a bit of warming in order to make the colors look normal. This is why the temperatures tend to lean towards the high Kelvin rating.
- Shade - The symbol is a house with some lines radiating out of one side. The temperature range is closer to 7300-7600 Kelvin. Shade is usually darker than even a cloudy day, and requires more warming to balance the scene.
- Tungsten - This symbol is a long line surrounded by some smaller lines radiating out. A caterpillar, if you will. Indoor lighting is tricky, and typically leans towards the warmer side, thus your indoor white balance temperatures are lower to cool the scene down. Tungsten ratings run in the 2500-2800 K range.
- Indoor/Fluorescent - Symbolized by a light bulb, this setting isn't quite as warm as tungsten. The temperature range is in the 3600-3900 K range.
- Flash - This is symbolized by a lightning bolt with an arrow, similar to the old super-hero "The Flash" and the logo he wore on his jumpsuit. The temperature range for this setting is very similar to daylight white balance range, around 5400-5500 K.
All of these white balance settings are fairly good at getting your image closer to correct while in the field. The newer the camera, the better the sensor is at actually being correct in "AWB" mode. If you've ever used a digital camera that was more than four or five years old, and compared it to a newer model, I'm sure you've seen firsthand how much better "auto" white balance has gotten.
If you really want to understand white balance, most all newer cameras have a "custom" setting where you can pick the Kelvin temperature depending on the scene. This also helps creatively to allow you to warm up or cool down a scene a bit more for creative effect. Yes, you can do that while at home on the computer, but I find that doing it in the field helps creatively so much more than if I do it later, after I've separated myself from the moment.
 |
| Shade setting |
 |
| Daylight setting |
 |
| Flash setting |
 |
| Tungsten/Fluorescent setting |
 |
| Finished image (4600 K) |
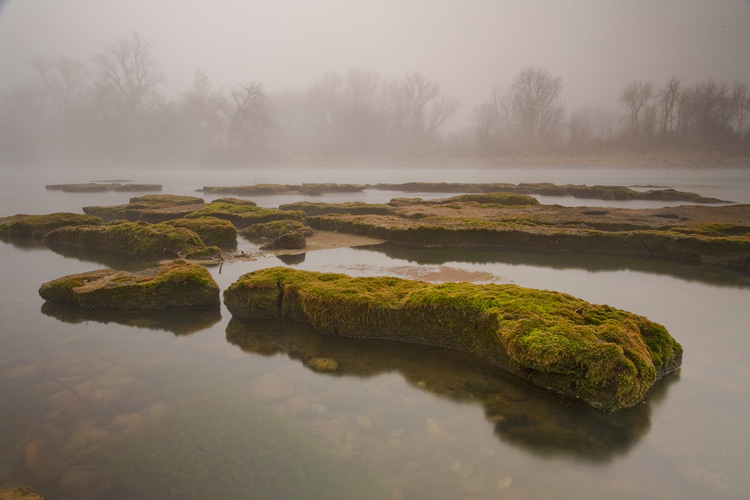
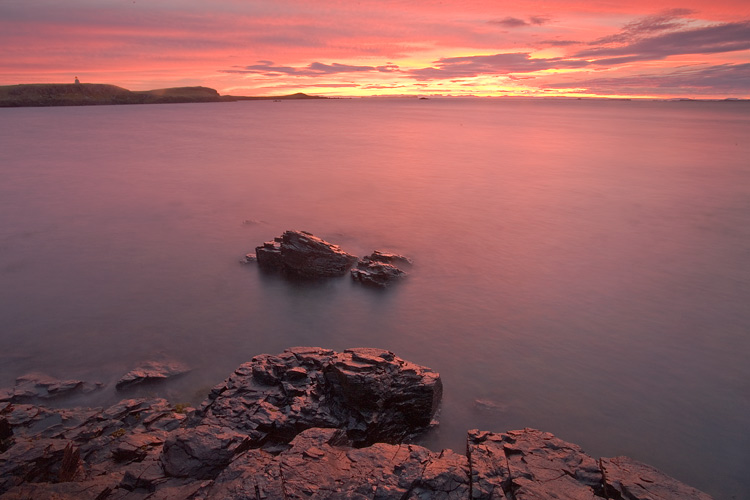
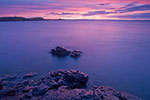
For a good example, take this image (to the right) that I took at a location I like to call The Furrows.
[Mouseover images to see them larger and in more detail.]
The scene that day was very foggy and had a cool tone to it. I used my white balance as a tool to see whether I liked the shot better cooler in tone, more natural, or warmer. I moved the settings around to some of the pre-sets, to see what the image looked like in different temperatures.
For me, the image was too warm when I shot it in Shade and even too warm when I shot it on Daylight and Flash.
This caused me to drop the white balance down to the other end of the spectrum, at Tungsten, to see what it looked like in a very cool setting.
Tungsten was way too blue for my liking...but it showed me that I did like the scene more on the cool side.
I went into my custom settings and adjusted the temperature somewhere between Tungsten and Flash — 4600 Kelvin was the temperature I ultimately ended up using, that I felt best showed the scene the way I wanted it.
The scene wasn't changing rapidly, so I had the time in the field to play with the settings to get it right. Had I waited until I got home, I think I would've forgotten how I liked the image...and tried to process it more to the warm side, which I feel loses the power of the scene.
When I'm photographing warmer scenes, sometimes I choose to warm up the white balance to really pull out those warm tones.
In a sense what I'm doing is telling the camera that the tones here are cooler (blues and purples) and some orange and red needs to be added to this scene to make it warmer.
This really gives the colors a bit more "pop" and also reminds me that I like the scene better warmly processed....
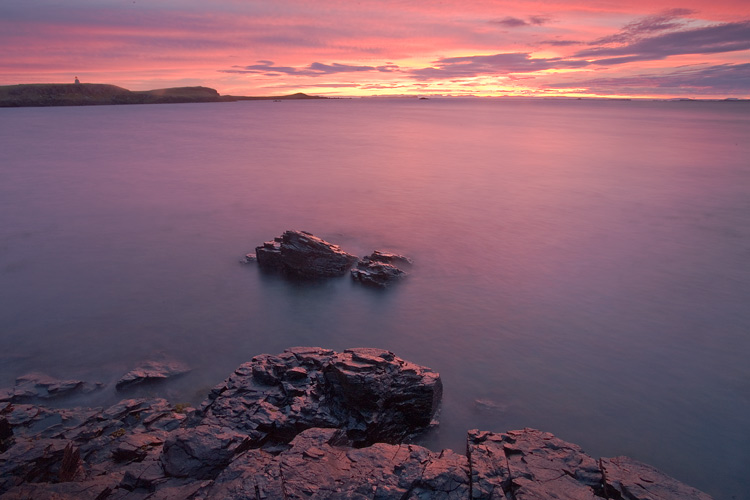
Another prime example is this scene I photographed in Iceland. When I shot it on AWB, the brightness of the sky caused the sensor to do some odd things.
 |
 |
| AWB (Auto) mode |
Tungsten/Fluorescent mode |
 |
 |
| Flash mode |
Shade mode |
The result it gave me in camera leaned way towards the blue/purple side of things. It looked alright to me but was nowhere NEAR the fire and warmth the reality was.
I began moving my white balance up on the scale past Fluorescent, and Flash towards the Shade setting, where I ultimately got the result I liked the best. A warm, rich scene that showed off the sunset the way it looked while I was there.
Had I left it on auto...and waited the 4 weeks until I was back home to process the images...I'm confident I would've lost the perspective I had on location and ended up with an image that paled in comparison to what I was looking for.
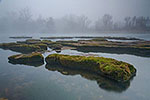
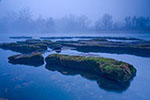
One of the best examples of learning white balance can be found at night.
Cameras, no matter how good they are, always have the most trouble figuring out white balance at night. Considering you're mixing a variety of natural light (moon, stars, reflected light off of clouds and atmosphere) with manufactured light coming from a variety of places, it's easy to see why cameras have issues figuring out where white is.
Typically, night scenes tend to need a lot of cooling.
 |
 |
| Daylight |
Fluorescent |
 |
 |
| AWB |
Custom: 3500 K |
 |
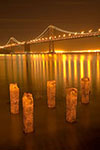
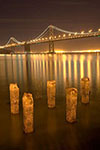
| Finished image (2500 K) |
This shot of the Bay Bridge in San Francisco, California, is a good example.
I shot it first on a Daylight setting, which yielded a VERY warm, almost disgusting result. I knew any setting above 5400 K was going to be ridiculous and too hot, so I started working my way down the Kelvin scale.
I tried Fluorescent, which gave me a better result...but still leaned a bit too warm.
I proceeded to try AWB just to see what my camera thought of the scene...and on this occasion it was fairly close to accurate. It was still a bit on the warm side, though, for my tastes and I switched over to Custom.
I started first with 3500 K, a bit lower than my fluorescent setting had rated it. I liked the scene, but for all practical purposes it wasn't much different than the other fluorescent...and I still wanted to see it with more cool tones.
The next setting was 2500 Kelvin, the lowest setting my camera has. This turned out to be the most accurate and made everything appear as it did when I was there.
The pilings in the foreground weren't too yellow/green and ugly...and the sky wasn't dark with the pale hint of gold the other settings gave it.
It was perfect and I knew that after I got back home there would be good accuracy of what the scene looked like when I was there.
White balance is tricky, and for some folks it's easier to set it and forget it, then deal with the adjustments later when they get home.
I'd like to encourage you to see white balance as a tool to use in the field to help you creatively and accurately get the scene right while you're there in the moment, so that when you get home and look at your images, you remember why it was you brought your camera out in the first place.
|