(A very rare day in Newfoundland I came to find out... I actually got a sunburn in Canada!)
How to get the sharpest wildlife photos possible
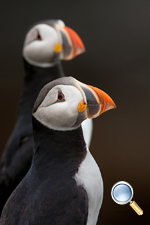
In the summer of 2010, I spent two weeks in Newfoundland photographing a cute little bird called the Atlantic Puffin. Over the years I've photographed a wide variety of animals, but this trip to Newfoundland, Canada, pushed the boundaries...high winds, difficult light and tiny little birds much smaller than I realized. I found myself using every strategy in the book in hopes of coming home with sharp, high quality images of these clumsy, fun little birds. I hope these tips will help you with your next photography adventure.
Stability
Stability is everything, especially with big glass. On this trip I shot with a Canon 500mm (f4) fixed with a Canon 1D Mark III and Canon 1Ds Mark III. I switched between the two, using the 21MP full frame sensor of the 1Ds3 for the portrait work, and the 1D3 for its blazing frame rate to best capture the action.
(Yes, I know you can't hear me talking...the winds on this day were 30-35mph!)
Given the best action was toward the end of the day, I mounted my Canon 500mm to a Gitzo tripod (with a Really Right Stuff Ballhead) and spread the legs out wide and low, which provided great stability in the wind and kept me low to the ground for good perspective on the Puffins.
I used my bag, hooked to the bottom of the tripod, to weight it all down even further and then I used a shutter release cord in conjunction with the Silent Mode on the Canon Pro camera body. This silent mode functions similarly to mirror lockup, in that it removes the mirror slap after the exposure is captured, which on a longer lens can vibrate through the lens like a shock wave and really impact the quality of your images. (More on this below.)
Fill the Frame (if you can!)
My next challenge was to get as close to these little critters as possible without harming their environment, scaring them or changing their behavior. As a wildlife photographer it's important to be respectful and remember you are the guest. What's the saying, "Take only pictures, leave only footprints." It's important to me to live that.
When I'm on a photo shoot with an intended target (in this case, the Atlantic Puffin) I always spend the first day getting to know the subject...their behaviors, their comfort level with me at 100 yards, at 75 yards, etc. I sit, wait and watch. I spend this time mostly observing and taking test shots; learning the light and the compositions I like best. You'd be amazed at how much you can learn just watching for a short time.
Knowing your subject will help you approach safely for them, and for you. You'll find with some observation and patience, you can get within range for quality photography. Always be respectful of this space, as you can never fully predict a wild animal's behavior.
The other method I like to use is the placement of a blind, a couple days prior to the shoot. This allows your subject(s) to get used to it, then you can sneak in under the cover of darkness and sit in wait. Often times this will put you right in the middle of the action!
My Favorite Techniques
There are many techniques that can help achieve tack sharp wildlife images, but here are my favorites:
Shutter SPEED!
I have a general rule that I like to follow and that is if I'm hand holding a shot, I try to have my shutter speed be double my focal length. Here's an example:
400mm lens (focal length) x 2 = 1/800th of a second shutter speed
Now I certainly aim for more if light and aperture allow and I always favor the lowest ISO I can afford. If I'm tripod mounted, using Silent Mode/Mirror Lockup, and have a good solid stability, then things change quite a bit and I can afford a slow shutter speed, particularly if my subject is somewhat slow and predictable.
Avoid Too Low an Aperture
It's natural to want to open up your aperture really wide. This lets more light into the sensor, allowing you to achieve faster shutter speeds and those really cool bokeh backgrounds. However, I fight that urge. I try to find that fine balance between shutter speed, bokeh and having my subject's focal plains sharp. What do I mean? For example, say you're photographing your dog and you focus on his face and you're shooting at f/4...it's likely you'll get a sharp nose and soft eyes. Now let's say it's a wolf and you only get one chance at it. My preference is to choose an aperture that's more likely to give me that clarity and sharpness I want. I'm a big fan of f/6.3-f/8 for many subjects I photograph.
Mirror Lockup (or Silent Mode)
It probably sounds odd to suggest "mirror lockup" and "wildlife photography" in the same sentence, but in the right situations it's a great combination, especially with portrait wildlife shooting. All that magnification from long glass, combined with low light and atmospheric conditions, make mirror lockup (or Silent Mode) a great combination. Take for example, the Puffin images I captured in Newfoundland — nearly all the portrait images I took were using this method...I'll let the examples speak for themselves.
Shutter Button Etiquette
This practice of pushing the shutter button really applies across any type of photography, but is really important in any kind of telephoto shooting. Often while teaching workshops I see photographers who "stab" or "poke" the shutter button, which causes tremendous vibration in the camera and can, and will, result in soft, and even blurry, photos.
With some practice, you can learn to roll your finger on and off the trigger with a smooth motion. This will not only reduce vibration, but your response time will become quicker to the action. For me, I prefer a shutter release cord whenever possible.
 When I'm on a photo shoot with an intended target (in this case, the Atlantic Puffin) I always spend the first day getting to know the subject...their behaviors, their comfort level with me at 100 yards, at 75 yards, etc. I sit, wait and watch. I spend this time mostly observing and taking test shots; learning the light and the compositions I like best. You'd be amazed at how much you can learn just watching for a short time.
 It's natural to want to open up your aperture really wide. This lets more light into the sensor, allowing you to achieve faster shutter speeds and those really cool bokeh backgrounds. However, I fight that urge. I try to find that fine balance between shutter speed, bokeh and having my subject's focal plains sharp. What do I mean? For example, say you're photographing your dog and you focus on his face and you're shooting at f/4...it's likely you'll get a sharp nose and soft eyes. Now let's say it's a wolf and you only get one chance at it. My preference is to choose an aperture that's more likely to give me that clarity and sharpness I want. I'm a big fan of f/6.3-f/8 for many subjects I photograph.

